Getting Started with Eclipse Data Grid
First of all, thanks for choosing Eclipse Data Grid! This page will help you in getting started with your first cluster online!
Register Your Account
In order to use our Cloud, you will first have to register your very own account! To start this process, simply head over to https://cloud.microstream.one and click the “Register”-Button at the bottom of the screen.
During this process, you will be asked after some brief details about yourself, such as your first and lastname. Once completed, we will request you to verify your email. Therefore, please check your inbox for a message from noreply@microstream.one. This message contains a verification link, which will expire 5 minutes after it was sent.
Complete Your Profile
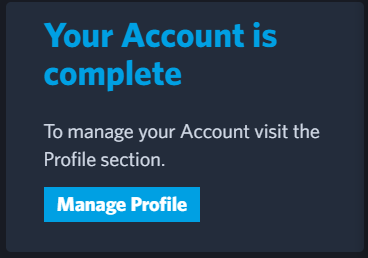
Once registered, you will have to complete your profile by adding more information. The Cloud will guide you towards completing this step with a notification on your homepage. Before any clusters can be started, we will also require a payment method to be added to your account. We currently only accept credit cards such as Visa or MasterCard. Your payment details are stored by Stripe, an independent third-party payment provider.
Once this step has been completed, the dashboard should display the following message:
In case your contact details change, we’d recommend updating your profile as soon as possible. This allows us to reach out to you quickly, in case there are urgent issues with your cluster.
Preparing Your Project
In order to get you started as easy as possible, we offer a Starter Template. To create a project using this template, simply head over to the “Starter”-Tab located on the sidebar.
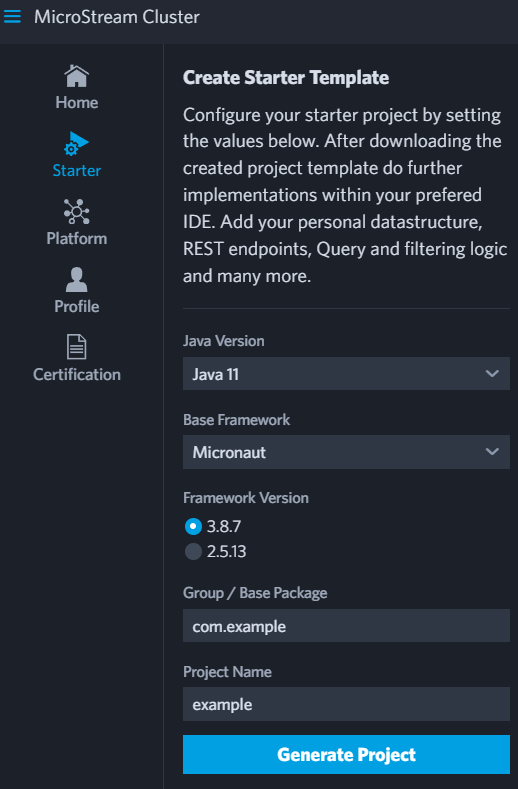
This template contains several important files. We’ll go into more detail about how the template works, here: The Eclipse Data Grid Starter Template.
| You can also deploy one of our Demo Applications which also provides the necessary Postman Collection / curl scripts for testing the deployed application. |
Adding the Platform
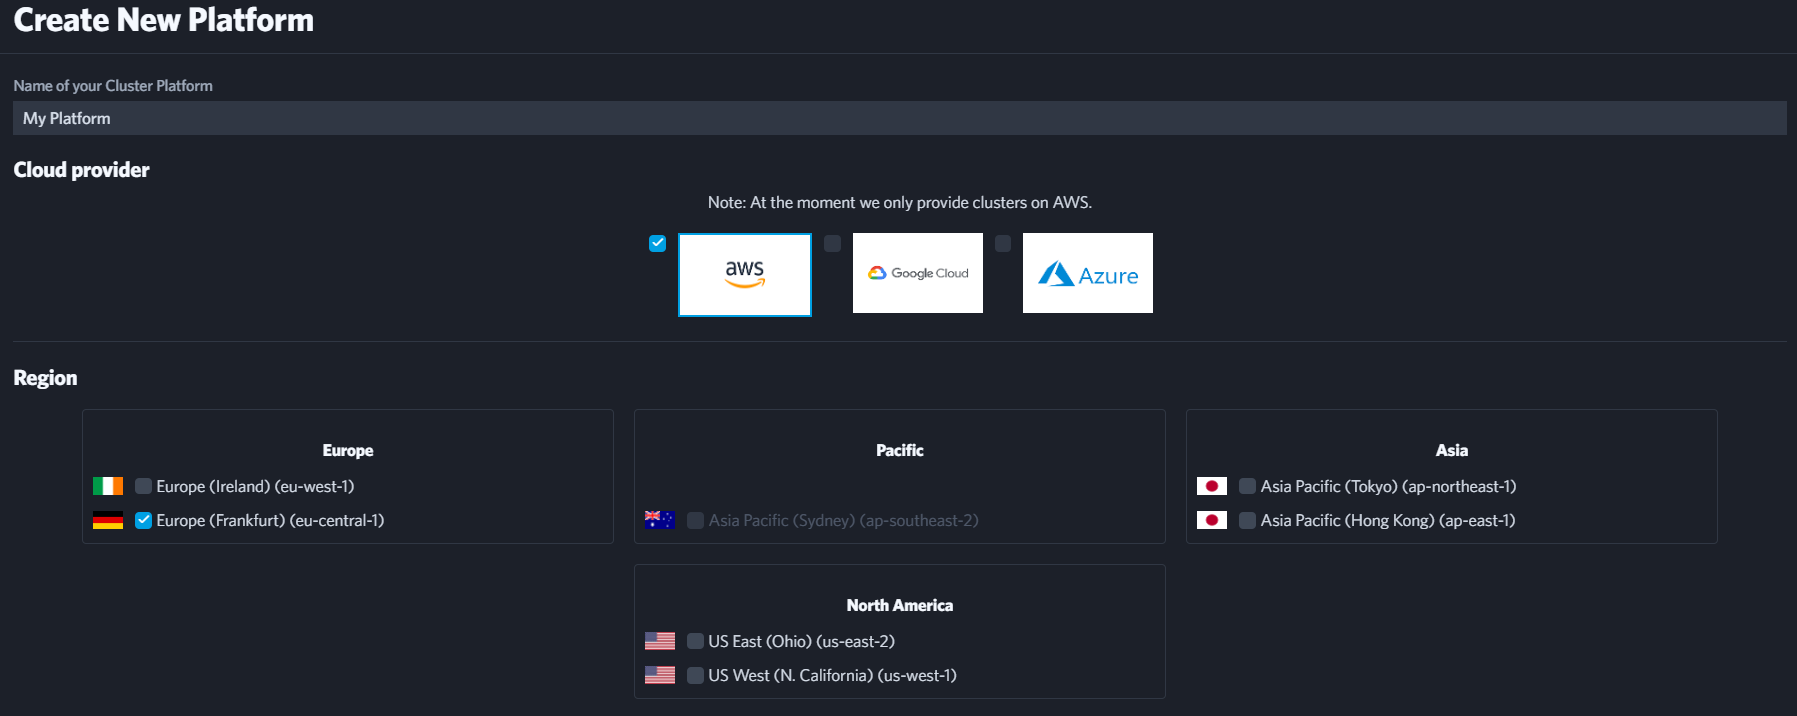
Before one or more clusters can be created, you need to add a platform, which is going to host the clusters:
Select the “Platform” tab on the left hand side and select “Add Platform”. This will open a new Dialog in which you can choose a name, the provider - AWS for example - and the region which the platform is going to be located in.
Selecting the Correct Provider and Region
While creating your platform, you will be asked to select a specific cloud provider and region. There are various factors to consider while doing so:
-
Costs, some regions and providers will cost more than others.
-
Integrations, hosting all of your Infrastructure at one cloud provider and platform may be cheaper by e.g. decreasing Internet data transfer costs.
-
Legal Requirements, certain laws in your country regarding data privacy may limit your choices.
| The process to create the platform can take up to 30 minutes! |
Creating Your First Cluster
Once you have your deployable project, you can very easily deploy it into our cloud. To do so, simply visit the “Platform” Tab in the sidebar menu, select the running platform which is going to host the cluster and then click “Create new Cluster”. From there, you will be guided through setting up your very own Eclipse Data Grid! Let’s go through the creation progress, together:
Choose your used application framework
First you need to select the application framework, which you have used in your microservice application. If you have created your project with the Micronaut Starter Template, then you are using the Micronaut Nodelibrary. You can check this dependency in your pom.xml. For Micronaut, it will look something like this:
<dependency>
    <groupId>one.microstream</groupId>
    <artifactId>microstream-enterprise-cluster-nodelibrary-micronaut</artifactId>
    <version>${microstream.nodelibrary.version}</version>
</dependency>
Choosing A Cluster Tier
Cluster Base Tier
Eclipse Data Grid supports various base tiers for the cluster, which will allow you to configure your cluster for your own needs. These tiers will set the foundation of the available configuration by:
-
Making the background data distribution more powerful
-
Giving you access to more powerful Storage Nodes
Storage Node Tier
Here you can configure the hardware specification for each storage node in your cluster. You can decide by the three given factors:
-
CPU (1000 Millicores is equivalent to 1 full CPU core)
-
Memory Space (The more memory space, the more data you can have available without loading data)
-
Storage Space (The more storage space, the more data you can store in total)
Storage Node Amount
This option allows you to select the amount of storage nodes running at any given time and during heavy loads. The Min Storage Node Count decides how many Storage Nodes will always be running at any given time. The Max Storage Node Count decides how many Nodes can join in when we need to scale up due to heavy loads.
| Depending on the set configuration, your costs for the cluster will vary in the price per hour depending on how many nodes are running. |
Provisioning Your First Cluster
Storage Project
Now we need to get your storage project into the cluster. In the Provisioning tab (depending on your selected Nodelibrary) you get different choices on how to upload your project. You can…
-
Let the cluster clone your project via git and build it for you
-
Or build the project yourself and upload the resulting fat jar
Environment Variables
If your application requires some special environment variables then you can specify them here! Click "Add" to add new variables, to edit existing variables you can simply double-click them in the table. If you want to delete one select it by clicking once and then pressing "Delete".
Securing Your Cluster
Backups
In order to protect yourself against data loss, Eclipse Data Grid also comes with integrated Backup functionality. You will be able to select how frequently and how many backups are kept.
Basic Auth
Additionally, to prevent any unauthorized person from accessing your cluster, you can also enable Basic Authentication. Doing so will prevent users without the correct username and password from accessing your endpoints. Create a username and click generate. Store the password somewhere safe as you will need it to access your cluster.
| After creation, you will not be able to view these credentials again. |
AWS Private Link
You can enable AWS Private Link to only allow other services you have deployed in AWS to access your cluster! Click here for more Information
Proxy Settings
The proxy tab allows you to specify what requests will go to your writer node. All other requests will be evenly distributed across all storage nodes.
| Any request that calls StorageManager.store() and similar are required to be sent to the writer node, or else an exception is thrown! |
Routing via HTTP Methods
This option will decide depending on the http method of the http request which requests should go to the writer node. If "POST" is selected then any request that has the POST http method will be sent to the writer node.
Routing via URL Path
This option will decide depending on a path prefix in the http request which requests should go to the writer node. If "/edit" is set then any requests that contain /edit in the path will be sent to the writer node.
Routing via Header Value
This option will decide depending on a Header-Key-Value-Pair in the http request header which requests should go to the writer node. If "Is-Modifying" is set then any requests that contain the Key-Value-Pair "Is-Modifying: true" in the http request header will be sent to the writer node.
Uploading your pre-existing storage
If you already have a storage that you want to deploy in the cloud then you can upload your storage in this tab. Click "Start cluster with an already existing database", choose your storage.zip file and click the Upload button.
| Your storage.zip file root should contain the storage root directly as shown in this screenshot |

Creating the Cluster
As you’re going through the creation tabs, the individual tabs should start light up green with checkmarks:

If they do not do so, you may have forgotten to fill in a required field. You can go back by simply clicking on each tab. Once all tabs are green, you will be able to click the "Create" button at the bottom. Doing so will provision your cluster. In this state it is fully configured but not yet actually deployed and running.
Launching and Accessing your Cluster
In order to launch the cluster you’ve just provisioned, simply click the green “Deploy Cluster” button!

Once clicked, your Eclipse Data Grid will create itself in the background. The startup process can take a couple of minutes for an empty storage. If you have a lot of data, this step will take longer. Once completed, the status will change to “Running”. In this state the endpoints defined in your Micronaut or Helidon Controller are available. To access them click the “Cluster URL” button on your cluster.
What’s next?
First of all, congratulations! If you’ve followed this tutorial, you should now be able to have your very own Eclipse Data Grid!
If you’re interested in learning how to manage your Cluster, please check out Managing your Eclipse Data Grid. If you otherwise need help with Eclipse Data Grid, please consider reaching out to our active Community on GitHub and StackOverflow!